Frameless Pool Fence Installation Guide – CFG Spigots
Congratulations on your purchase of Beyond Architectural’s CFG Spigots.
Below are some steps to follow to ensure a good result for installation
Into concrete :
Have a minimum allowance of 80/100mm to core drill down into the reinforced concrete slab. The80/100mm depth excludes the thickness of the tiles and cement bed.
Onto timber :
Must be hardwood and have a minimum of 60mm grab for fixings to the hardwood timber beam. Base plates are 100mm x 100mm dimension.
On Soil :
Need to create a minimum reinforced concrete footing of 300mm wide x 300mm deep to ensure a strong hold or depending on soil conditions can additionally dig for some 300mm dia x 600mm deep concrete footings to stabilise.

Stage 1
Clear the proposed area and get your tools, glass and spigots ready
Stage 2
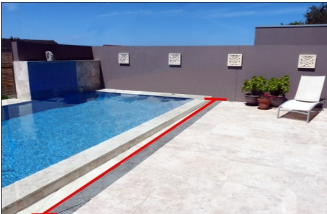
With a string line mark out the line for which you would like to have your glass pool fence
Stage 3
With a chalk or pencil mark out your glass panels widths leaving gaps between the panels usually of about 40-50mm but under 100mm
Stage 4
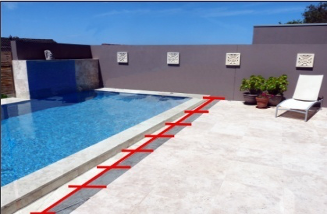
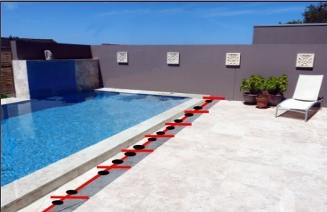
With another colour chalk or pencil mark out your core hole positions.
We suggest that the core hole positions are 15-20% in from both edges of the glass panel.
Stage 5
Lie your panel on a suitable protected trestle table Slide the spigot floor cover plate on, down over the top of the spigot.
Attach your spigots to the glass and tape up the floor cover plate to the underside of the glass panel with low tack easy to remove painters tape.
Your CFG spigot is made from a Composite reinforced material which needs to have different attention compared to the installation of a standard stainless steel spigot
GRUB SCREWS ATTACHMENT OF THE SPIGOTS TO GLASS MUST BE HAND TIGHT ONLY
DO NOT USE AN ELECTRIC DRILL BECAUSE THE UNCONTROLLABLE TIGHT- NESS AND PRESSURE MAY RESULT IN DAMAGE TO THE SPIGOT AND GLASS
Colour coatings
The surfaces of the spigots have been coated with an automotive finish Protect the coated surfaces of the spigots to prevent scratching during installation
Final installation
Get some timber blocks (40-60mm height) to support and hold up the glass with the attached spigots so that the spigots are suspended in the core holes and not touching any of the walls within the holes.
Level the glass siting on the blocks with plastic packers
Use timber wedges to position the glass panels laterally and in alignment to each other. Use glass clamps for further lateral alignment between each panel
Once level, mix enough SuperSet quick dry cement and pour carefully into the core holes Once set, remove the timber blocks and packers and top up the core holes to the level of the reinforced slab only (not to the tiles and bedding cement).
Remove the tape and lower the spigot floor cover plate over the core hole.
Can later top up the holes to tile level with the tile bedding grout and not with the SuperSet cement.
Refer to our separate instructions regarding the use of SuperSet cement.